Sunday, February 22, 2015

Create Fields Collection Esri ArcObjects Snippets - Series

Esri ArcObjects Snippets - Series

Create Fields Collection


 // create field collection for table  
 public IFields createFieldsCollectionForTable() throws Exception {  
      // Create a new fields collection.  
      IFields fields = new Fields();  
      // Cast for IFieldsEdit to modify the properties of the fields  
      // collection.  
      IFieldsEdit fieldsEdit = (IFieldsEdit) fields;  
      // Set the FieldCount to the total number of fields to be created.  
      fieldsEdit.setFieldCount(2);  
      // Create the ObjectID field.  
      IField fieldUserDefined = new Field();  
      // Cast for IFieldEdit to modify the properties of the new field.  
      IFieldEdit fieldEdit = (IFieldEdit) fieldUserDefined;  
      fieldEdit.setAliasName("FID");  
      fieldEdit.setName("ObjectID");  
      fieldEdit.setType(esriFieldType.esriFieldTypeOID);  
      // Add the new field to the fields collection.  
      fieldsEdit.setFieldByRef(0, fieldUserDefined);  
      // Create the text field.  
      fieldUserDefined = new Field();  
      fieldEdit = (IFieldEdit) fieldUserDefined;  
      fieldEdit.setLength(30); // Only string fields require that you set the  
                                         // length.  
      fieldEdit.setName("Owner");  
      fieldEdit.setType(esriFieldType.esriFieldTypeString);  
      // Add the new field to the fields collection.  
      fieldsEdit.setFieldByRef(1, fieldUserDefined);  
      return fields;  
 }  


This code has been made using ESRI Resources and other Help Content and is provided here just for educational purpose.

Saturday, February 21, 2015

Create Feature Class Esri ArcObjects Snippets - Series

Esri ArcObjects Snippets - Series

Create Feature Class


 // Create Feature Class  
 static IFeatureClass createFeatureClass(IFeatureDataset featureDataset,  
           String nameOfFeatureClass) throws Exception {  
      // This function creates a new feature class in a supplied feature  
      // dataset by creating all fields from scratch. IFeatureClassDescription (or  
      // IObjectClassDescription if the table is  
      // created at the workspace level) can be used to get the required  
      // fields and are used to  
      // get the InstanceClassID and ExtensionClassID.  
      // Create new fields collection with the number of fields you plan to  
      // add. Must add at least two fields  
      // for a feature class: Object ID and Shape field.  
      IFields fields = new Fields();  
      IFieldsEdit fieldsEdit = (IFieldsEdit) fields;  
      fieldsEdit.setFieldCount(3);  
      // Create Object ID field.  
      IField fieldUserDefined = new Field();  
      IFieldEdit fieldEdit = (IFieldEdit) fieldUserDefined;  
      fieldEdit.setName("OBJECTID");  
      fieldEdit.setAliasName("OBJECT ID");  
      fieldEdit.setType(esriFieldType.esriFieldTypeOID);  
      fieldsEdit.setFieldByRef(0, fieldUserDefined);  
      // Create Shape field.  
      fieldUserDefined = new Field();  
      fieldEdit = (IFieldEdit) fieldUserDefined;  
      // Set up geometry definition for the Shape field.  
      // You do not have to set the spatial reference, as it is inherited from  
      // the feature dataset.  
      IGeometryDef geometryDef = new GeometryDef();  
      IGeometryDefEdit geometryDefEdit = (IGeometryDefEdit) geometryDef;  
      geometryDefEdit.setGeometryType(esriGeometryType.esriGeometryPolyline);  
      // By setting the grid size to 0, you are allowing ArcGIS to determine  
      // the appropriate grid sizes for the feature class.  
      // If in a personal geodatabase, the grid size is 1,000. If in a file or  
      // ArcSDE geodatabase, the grid size  
      // is based on the initial loading or inserting of features.  
      geometryDefEdit.setGridCount(1);  
      geometryDefEdit.setGridSize(0, 0);  
      geometryDefEdit.setHasM(false);  
      geometryDefEdit.setHasZ(false);  
      // Set standard field properties.  
      fieldEdit.setName("SHAPE");  
      fieldEdit.setType(esriFieldType.esriFieldTypeGeometry);  
      fieldEdit.setGeometryDefByRef(geometryDef);  
      fieldEdit.setIsNullable(true);  
      fieldEdit.setRequired(true);  
      fieldsEdit.setFieldByRef(1, fieldUserDefined);  
      // Create a field of type double to hold some information for the  
      // features.  
      fieldUserDefined = new Field();  
      fieldEdit = (IFieldEdit) fieldUserDefined;  
      fieldEdit.setName("Avg_income");  
      fieldEdit.setAliasName("Average income for 1999-2000");  
      fieldEdit.setEditable(true);  
      fieldEdit.setIsNullable(false);  
      fieldEdit.setPrecision(2);  
      fieldEdit.setScale(5);  
      fieldEdit.setType(esriFieldType.esriFieldTypeDouble);  
      fieldsEdit.setFieldByRef(2, fieldUserDefined);  
      // Create a feature class description object to use for specifying the  
      // CLSID and EXTCLSID.  
      IFeatureClassDescription fcDesc = new FeatureClassDescription();  
      IObjectClassDescription ocDesc = (IObjectClassDescription) fcDesc;  
      return featureDataset.createFeatureClass(nameOfFeatureClass, fields,  
                ocDesc.getInstanceCLSID(), ocDesc.getClassExtensionCLSID(),  
                esriFeatureType.esriFTSimple, "SHAPE", "");  
 }  


This code has been made using ESRI Resources and other Help Content and is provided here just for educational purpose.

Create Feature Data Set Esri ArcObjects Snippets - Series

Esri ArcObjects Snippets - Series

Create Feature Dataset


 // Create feature dataset  
 static IFeatureDataset createFeatureDataset(IWorkspace workspace,  
           String fdsName, ISpatialReference fdsSR) throws Exception {  
      IFeatureWorkspace featureWorkspace = new IFeatureWorkspaceProxy(  
                workspace);  
      return featureWorkspace.createFeatureDataset(fdsName, fdsSR);  
 }  


This code has been made using ESRI Resources and other Help Content and is provided here just for educational purpose.

Create Workspace Esri ArcObjects Snippets - Series

Esri ArcObjects Snippets - Series

Create Workspace


 // Create Workspace  
 IWorkspace openFromString_fGDB_Workspace(String connectionString)  
           throws Exception {  
      IWorkspaceFactory2 workspaceFactory = new FileGDBWorkspaceFactory();  
      return workspaceFactory.openFromString(connectionString, 0);  
 }  


This code has been made using ESRI Resources and other Help Content and is provided here just for educational purpose.

Create Database Esri ArcObjects Snippets - Series

Esri ArcObjects Snippets - Series

Create Database


 // Create Database
 public void createdatabase() {  
      String file = "D:\\work\\PAKdatabase";  
      // ***Create Database  
      try {  
           // Create a FileGDB workspace factory  
           IWorkspaceFactory workspaceFactory = new FileGDBWorkspaceFactory();  
           // Create a new File geodatabase  
           IWorkspaceName workspaceName = workspaceFactory  
                     .create("D:\\work\\", "MyFGDB.gdb", null, 0);  
           System.out.println("workspaceName = " + workspaceName.toString());  
           // Cast for IName  
           IName name = (IName) workspaceName;  
           System.out.println("name = " + name.toString());  
           // Open a reference to the access workspace through the name object  
           IWorkspace workspace = new IWorkspaceProxy(name.open());  
      } catch (Exception e) {  
           e.printStackTrace();  
      }  
 }  

This code has been made using ESRI Resources and other Help Content and is provided here just for educational purpose.

Sunday, October 26, 2014

Configure Eclipse for Arcobjects SDK for Java

Configure Eclipse for Arcobjects SDK for Java

This post will guide you on how to instal and configure arcobjects sdk for java.

After installing you’ll get the folder of DeveloperKit10.2 in C:\Program Files (x86)\ArcGIS\DeveloperKit10.2 or whatever your installed directory is.
  
Now install Eclipse ide after Eclipse is installed we have to import the arcobjects library or install it into eclipse.
Open Eclipse
Go to Help à Install New Software à Click on the Add button


In Name Enter Arcobjectslibrary à click on Local button and select the path
C:\Program Files (x86)\ArcGIS\DeveloperKit10.2\java\tools\eclipse_plugin\arcgis_update_site\arcobjects
Or whatever your installed directory of ArcGIS is.


And click ok. It will take some time and might give you error that arc gis palette cant be installed So for that you have to install swing in Eclipse first before installing arcobjects.
(Installing Swing and other components is easy Just open eclipse à Help à Instal New Software à click on the drop down and select the site of your eclipse version as in my case its kepler)


Under General Select Swing designer and AWT designer and click install. Now it’ll take some time to install.
After its installed try again installing arcobjects and this time it’ll get installed. How ever if the Pallete does not gets installed then no worries J
Okay now Lets get started

For ArcGIS 10.0 and older versions I’ll recommend you to use 32 bit eclipse and 32 bit Java but for ArcGIS 10.1 or newer it don’t really matter. I am using 10.2 ArcGIS and for that I am using 64 bit eclipse and for Java I am using 64 bit but for eclipse in general but for arc objects you require 32 bit I’ll tell you how you can manage this.
We’ll start by running a small sample to show you how to run it and also to help you cater the basic error which might occur. After that I am going to show you about how to make a basic add in (toolbar button dockable window etc) in ArcObjects for ArcGIS.

ArcObjects Development, Developing Stand Alone GIS Desktop Applications and Developing Addins for ArcGIS Desktop


Develop Addin for ArcGIS Part 1


Develop Addin for ArcGIS Part 2

Develop Addin for ArcGIS Part 2

Develop Addin for ArcGIS Part 2

To see the part 1 click here

In this post we'll develop Add in for ArcGIS.
 We have configured the Eclipse project for Addin Development using Arcobjects and also configured the Java for it.
To configure Project for ArcObject see this post.

We have the project setup for this. you can see the config.xml file in its addin view (we'll talk about the views later). This view helps alot and makes sure the consistency and their are no errors in config file. Through this we can add different buttons, tools, meus, system tools, dockable window, palette etc and also can organize them.
Click on the source tab at the bottom of config.xml and you can see the xml source code.
Click back to addin view.
Add the details of project Name company etc etc What they are ? you can find help regarding this in esri resource help.

http://resources.arcgis.com/en/help/arcobjects-java/concepts/engine/

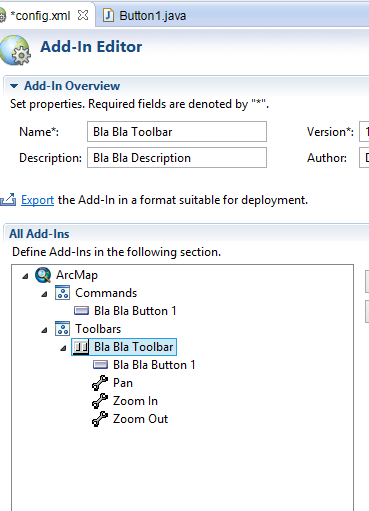
Click on add button and Add the toolbar.
Give name and id. This id will be used in our java classes later.

Add some System tools e.g zoomin, pan etc.

After Adding Click on Toolbars and you'll see that it refreshes it self and you'll see the added system tools are shown under your toolbar.
Now we'll add custom functionality. Click on Add and select button. A new button will be created. you have to add this button to your toolbar explicitly by again selecting the toolbar and adding the new button to right pane.

Fill in the details 

Click on Class button and press finish.

Class will be formed

Enter the following code.

Add the button to toolbar.

You can see the button added to toolbar

On Config.xml press export to add addin to ArcGIS. Now there are different methods to deploy your addin. I will follow the simple approach of direct deploying. 
You can see the list of deploying options and details here
http://resources.arcgis.com/en/help/arcobjects-java/concepts/engine/#/How_to_deploy_your_add_in/0001000006sp000000/

You can give the path of C:\Users\Blabla\Documents\ArcGIS\AddIns\Desktop10.2 and press finish. A warning may appear press ok.

Open ArcMap and click on customize and then click on addins and see the installed addin.
Again click on customize and the click on toolbars and add you toolbar.
You can see our toolbar.

Click on the button and see the Hello World ;)